Set Up Visit Tracking from QR Codes
This feature is available as part of our service validation add-on module. If you'd like to explore adding this feature, please email support@orangeqc.com.
Visit tracking allows teams to print QR codes linked with buildings, areas, or subareas. Teams can scan these codes to save time and increase accountability.
What Is Visit Tracking?
Visit tracking creates a record of a physical visit to one of your locations. Users check-in via a QR code posted onsite, then go on to inspect as usual. When they're done, they check out.
The visit not only organizes the actions the user performed to create a comprehensive record, but also adds timestamps and GPS locations for additional insight into when and where work is being done.
Setting Up Visit Tracking
Creating QR Code Signage
Every area in your account already has a corresponding QR code and unique link built in. When it's scanned, the system will detect different permissions, which user, etc. to determine next steps.
You can print QR codes from the Setup tab, or from individual areas.
To print from the Setup tab:
- Log into the OrangeQC web app as an administrator.
- Click the Setup tab.
- Choose "QR Codes" from the left-hand sidebar. This will appear if you're a part of our beta test group.
- Select the areas you want to print QR codes for. First, choose the areas you'd like to generate codes for from the area picker. Then, select from the options to generate QR codes for all areas at and within the selected area, or only the selected areas.
- Choose your print format. Choose between two formats: 2"x4" (10 QR codes per sheet), which print onto Avery Template 8163 labels; or 1"x1" (48 QR codes per sheet, designed for door jambs), which print onto Avery Presta® 94103 labels.
To print from an individual area:
- Log into the OrangeQC web app as an administrator.
- Click on the Setup tab.
- Navigate to the area you need a QR code for. Click on that area.
-
Click "More" in the right-hand sidebar. This will bring up a drop-down menu with options to move the area or generate a QR code. Click "QR Code."
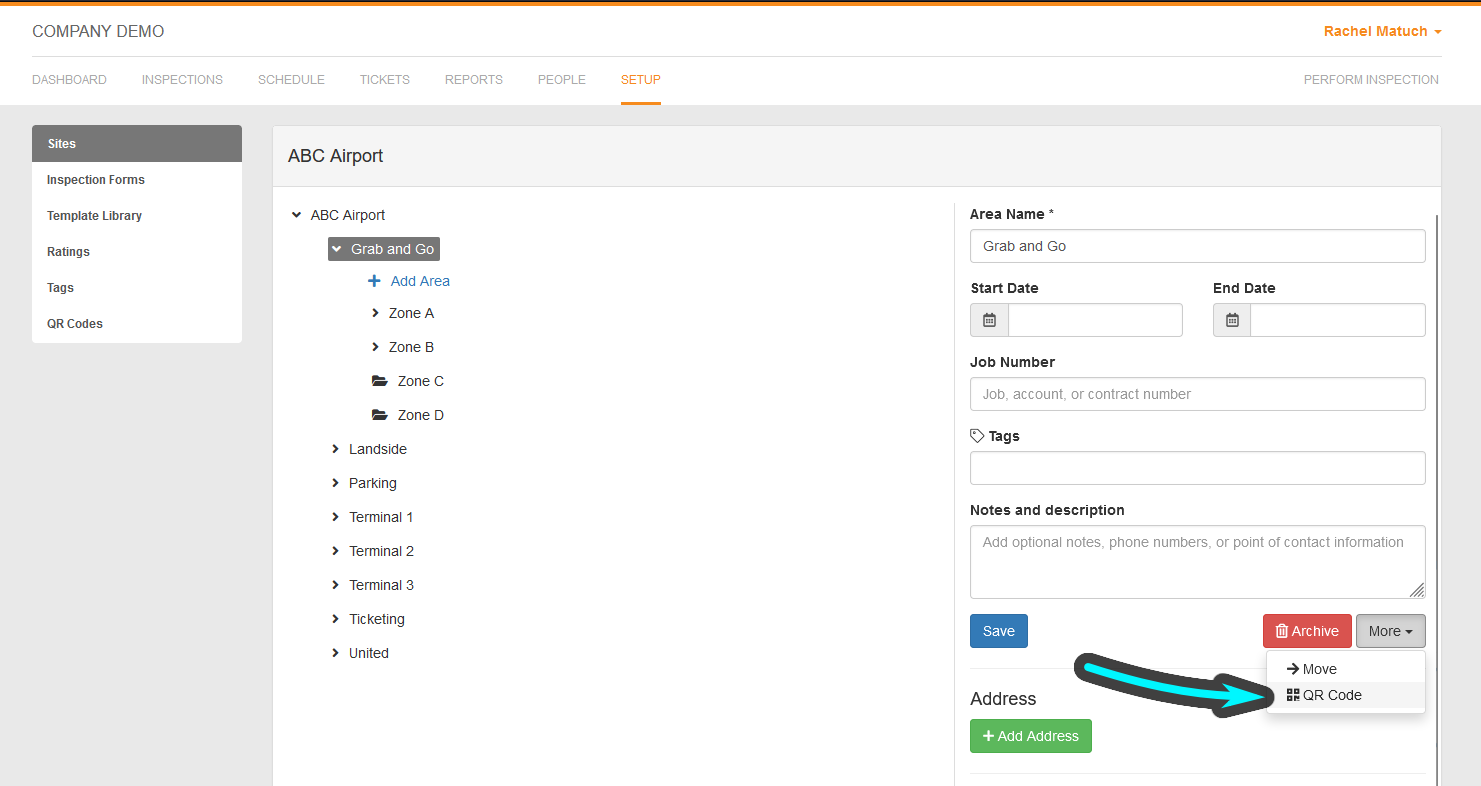
- Download the image. You can right-click on the QR code that pops up and choose "Save Image As" to save it as a PNG image file, or click the "Download PDF" option to save it as a PDF file.

To create your own custom QR codes:
You can also use your own custom QR codes to directly link to an area. This can be useful for teams who are already using Flowcode or another system that generates QR codes.
Follow the steps 1-4 above for printing a QR code from an individual area. Instead of saving the QR code image, copy the direct link in the text field beneath the image.
Posting QR Codes
Place the codes in discreet locations, such as on a door jamb or near an entrance.
To make it easy to match codes with specific areas, the 2"x4" label PDF includes the name of the area on each individual labels. The smaller 1"x1" labels include the unique area number, and also print with a table that matches each number with its area name.
Enabling User Permissions
Before your team can begin using QR codes, you'll have to enable the feature.
- Log into the OrangeQC web app as an administrator.
- Click the People tab. This will bring up a list of all users on your account.
- Choose the user who needs permission. This will bring up their profile.
- Scroll down to "Permissions." Visits permissions are at the bottom of this section.
- Check the box for "Can track visits."
- Click "Save."
Using Visit Tracking
Click here for a short how-to on using visit tracking in the OrangeQC app.
Once you've enabled visit tracking for your team, you may want to send them the guide above to get them up to speed on using QR codes, checking in, checking out, and linking inspections to visits.
Reviewing Visit Tracking Data
Your new Visit Log view tracks all check-ins and check-outs along with areas, timestamps, GPS locations, and associated inspections.
To access the Visit Log:
- Log into the OrangeQC web app as an administrator.
- Click on the Reports tab. This will bring up a list of all the reports you can generate.
- Click on the Visit Log report option. This is at the bottom of the list or reports.
The Visit Log displays a map of the GPS locations where check-ins occurred, followed by a list of visits. Click "Filters" in the upper right-hand corner for options to filter by date, inspector, or location.
Frequently Asked Questions
What are the benefits of using QR codes?
QR codes serve as shortcuts to the correct area. They save time by taking inspectors straight to the location they're inspecting, with no more searching or navigating through the area hierarchy.
Does a user have to be an inspector for visit tracking to be enabled?
No. You can enable visit tracking for any user on your account. In the future, you’ll also be able to link tickets, service validations, and other validations to a visit to create an audit history and timeline for built-in accountability.
What are your future plans for visit tracking?
QR code shortcuts and visit tracking are the foundations for future features like service validations and feedback pages.
Who can I send a question, suggestion, or other feedback?
Emailing our team at support@orangeqc.com is the best way to get in touch, because it allows our whole team to see your message and reply quickly. We can also set up a call if you'd like to go over things one-on-one.